Tuesday, September 30, 2008

{Last Day}


Wholey moley! Today's the last day of September 2008. How will you spend your day?

Here are my plans:
* work on my resume

* upload pics to Flickr

* grocery shop @ Trader Joe's

* yoga class
* take a hot bath

* write in my gratitude journal
* fall fast asleep ;)

Monday, September 29, 2008

{DIY: Thank You Cards}

I've been all about the DIY lately and I'm excited to share my latest creation with you. The great merry go lucky Etsy shop is where I ordered my custom rubber stamp. And the paper I used to stamp these cards on are paint chips from my local Ace Hardware. We had a large collection of them in the studio, so instead of having them go into the trash I put them to good use. With name colors like chic blue & wishful thinking printed on the bottom corner how could I resist. ;)
Have fun creating your own custom printed cards!

{ Jorge Oswaldo: Vinyl Artist}


I've been following this inspiring L.A artist for years. Jorge Oswaldo uses vinyl layering and eye popping color to make his designs have such a grand visual presence, making it hard to pick a favorite. The layers of vinyl are then affixed to multiple pieces of plexiglas. This layering affect creates depth & interest at very angle. I've seen his work in person and trust me these photos only due them half justice. Check out the video of Jorge Oswaldo’s walk through his studio, his process, and his incredible work with vinyl. You’ll never look at stickers quite the same again!

Friday, September 26, 2008

{ Free People }


{Photos by Free People}

I blame the shifting of seasons on my current online shopping obsession. Something about the romantic notion of changing leaves, chilly cozy nights spent snuggling under blankets with a good book & hot tea to keep you company. Oh...I digress. Take a quick flip through Free People's online catalog sometime this weekend. I'm loving all the head wear that is big this season along with all the lovely hues of plums & purples! Have a great weekend everyone ;)

Wednesday, September 24, 2008

{ Amy Butler: Dinnerware Collection }


Amy Butler fans can now enjoy her designs while entertaining! Clean lines and curved silhouettes frame vibrant florals to create a setting that is lush, romantic and graceful. Made of the finest quality porcelain, Vintage Botanica's distinctive, sophisticated style is vintage inspired making it the perfect dinnerware for both casual and elegant entertaining. Designed by Amy Butler for Mikasa.


{Photos by Amy Butler}

{ Rethink Everyday Objects }

This morning over at Creature Comforts, the lovely EZ posted about home decor and how sometimes the simplest personal touches can start your day on the bright side. It got me thinking about a few everyday objects that I've repurposed to serve a function and for display. The best part is you don't have to spend lots to make the everyday work in your favor. Here are some of my favorite everyday objects that make me smile. ;)


A flea market find (5 bucks) that used to hold tea lights now serves as my earring display.


The birdie & camera (both flea market finds) serve as shelf organizers & make me happy to look at.

Monday, September 22, 2008

{ DIY: Business Cards }

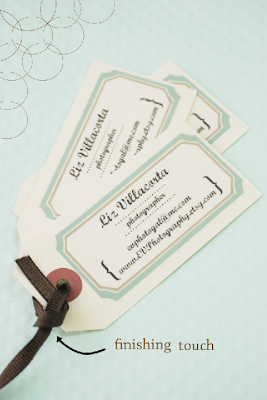
I've been busily working to get this tutorial put together & now I'm excited to share my finds and photos with you to help you create your custom business cards or other promotional materials. I'm a big fan of finding new print materials to play around with and these Avery clear labels + shipping tags are all you really need to create cards that look as stylishly presentable as you are! Enjoy making these in a wide variety of sizes (because the clear labels are actually 8 x 10 sheets of printable goodness!) Make an afternoon of designing, printing, and putting these together. BONUS: I've included this design as a free printable download under the Fresh from EV's Studio column to the right of my blog. Enjoy & happy promoting!
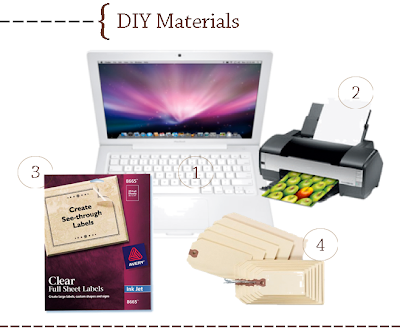

{1}.Laptop
{2}.Printer

{3}.
Avery Labels 25/pk. $23.99
{4}.
Shipping Tags

_______________________________________________

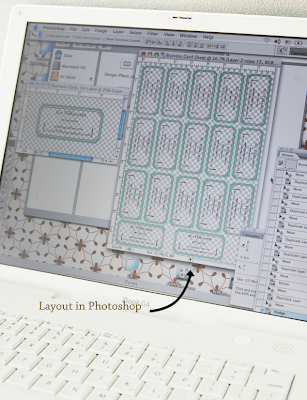
STEP 1: Design & Layout

Using Photoshop or another photo editing program create a new 4 x 6 sized document. I find that designing one label in this smaller document size is easier and allows you to save a smaller file for future revisions. After I'm happy with my design and type placement I create an 8 x 10 document (this is a little smaller than the 8.5 x 11 Avery paper size). Copy & paste your finished label into this new document and arrange your label to desired printable size. (see photo below) For my labels I printed them 3.5 x 1- 3/4 to fit onto my shipping labels. Continue to copy & paste your label until you fill your 8 x 10 document. I was able to fit 17 onto one page. Make sure to leave enough space in between each label to allow for cutting.


_______________________________________________

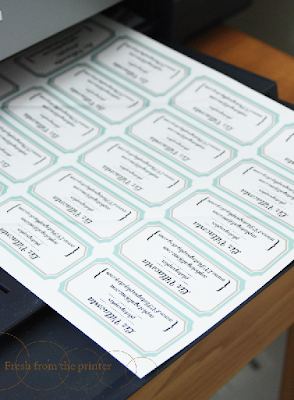
STEP 2: Printing

Adjust your printers settings to match your paper size & paper type. For this printing material I used the paper size 8.5 x 11 and the setting for luster paper.

_______________________________________________

STEP 3: Cut/Peel & Paste

Once printed I recommend using a straight edge and exacto knife to trim away the excess white around your labels.
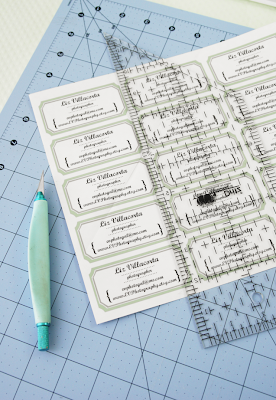

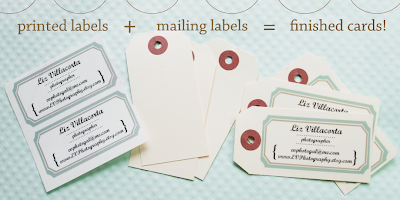
Gather your shipping labels and printed labels. Peel the backing off your printed label (yes, these are like stickers)! Place and secure onto the shipping label.

_______________________________________________

STEP 4: Add Personal Touch

Add your finishing touch to your personalized cards & start handing them out! Yay.