I look forward to wrapping my gifts tonight, especially getting to use some of this lace ribbon to complete some special gifts! Although this does take some time to complete (I did mine while vegging in front of the tv) it's totally re useable and because the color choice is not very holiday specific, it would be great to use for a birthday, house warming, or hostess gift too! I'm loving the results and I hope you get a chance to paint a spool or two yourself :) Happy wrapping!
Showing posts with label handmade holiday. Show all posts
Thursday, December 22, 2011
Monday, December 19, 2011
Holiday Home
When I take a moment to think about this holiday season I feel blessed with an abundance like no other this year. Blessed to have my family (close by), a sound body and mind, love that continues to grow, confidence, peace of mind, and a steadfast passion to create- all on the brink of my 30th birthday (no less). And a large part of this happiness comes from this little creative outlet of a blog and all the great people I've been so fortunate to meet along the way! Your comments truly inspire me and help to motivate me to keep going and growing. Thank you for all your encouraging thoughts and good cheer.
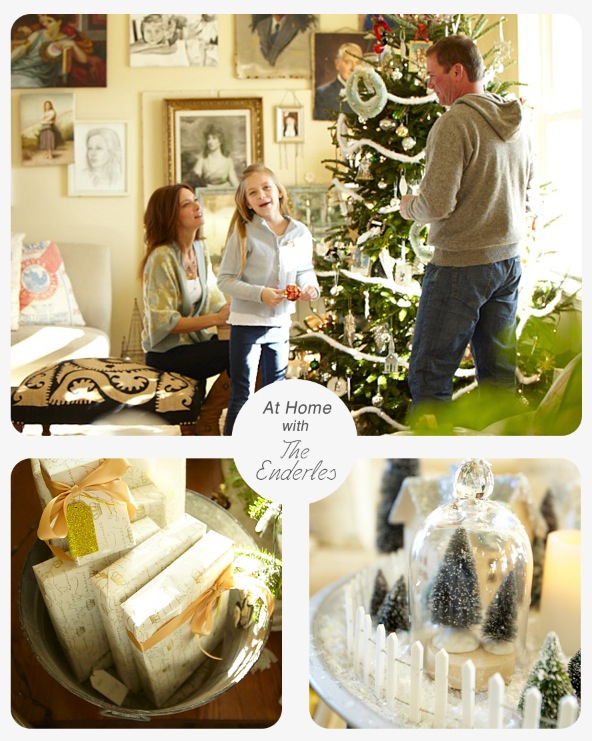
I can't wait to keep pouring my thoughts and ideas and share them with you here! Here are a few snippets of what my home currently looks like this year. Check out another amazing holiday home from my friend Theresa from inspirationCooperative. Theresa said by sharing photos of your home, it's almost as if we (bloggers) are spending the holidays together! I couldn't agree more with you Theresa!
Wednesday, December 14, 2011
Handmade Holiday: Vanilla Extract
A perfectly simple gift for those who love to express themselves in the form of baked goods. Joe and I whipped up a small batch of these bottles for a few of our family members (sshhh.. don't tell). They are already turning a yummy carmel color but they won't reach full potency until the end of next month, hey something that our family will HAVE to wait to use! Feel free to get creative and create your own label or download one of mine here. Anyway you make it, this is sure to be a gift that will continue to give all year long :)
Tuesday, December 13, 2011
Home for the Holidays: Photo Session
Over the weekend Joe and I spent Saturday afternoon capturing my friend Jill and her family in their beautiful home. Jill works as a photo stylist, so I was even more excited to see how she had decorated this year for the holidays. We had so much fun photographing her and the family decorating the tree, drinking lots of coffee and just spending the afternoon together. The hard part for me was picking out my favorites to share with you today. Happy Holidays!
Thursday, December 1, 2011
DIY Advent Calendar
Enjoy this little DIY I put together for you to countdown the 25 days of Christmas! I got this idea when I found out that these plastic sleeves were going to be thrown out at work. I thought they would be the perfect size for a project like an advent calendar. And since I don't have a mantel, I pinned these to the garland going up the stairs instead. They just add a nice pop of holiday color to the staircase, I think. Have fun making one for yourself! Let me know how yours turns out :)
Thursday, December 16, 2010
Cookie Exchange
Every year (for the past 8 years) the women in my family get together around the holidays to share in one another's favorite baked goodies. For my cookie of choice this year I decided to tackle the gingerbread variety. In part because I love anything with ginger in it and my favorite part is the decorating. I used this recipe from Martha Stewart, because one it calls for fresh and ground ginger and because I loved the photo as a source for decorating inspiration. You can find more if you pick up this months issue of Good Housekeeping too :) I decided to make and bake the cookies at my place so that we could relax and really enjoy decorating them the next day together. Today I have for you some of the cookie exchange highlights.
Tuesday, December 14, 2010
Guest Blogging Today...
Come check out this quick and crafty DIY I put together for blogger gal Courtney over at You Will Won't You? For those of you who don't know Courtney and I go way back. We went to the same grade school and even had a class together at Columbia College in Chicago...yep! Head on over to her blog to start crafting your own paper doily snowflakes!
Thursday, December 9, 2010
Greetings


Snap, print, cut, fold, sign..sigh. That's pretty much how my night went last night all while watching Top Chef All Stars. Creating our holiday card was super easy and fun thanks to this free hand drawn card by mufn. I printed them on Epson matte photo paper and they folded awesomely! For quick color prints I order through snapfish. What I like about them is that I can pick them up the same day at any participating stores (i.e Walgreens or Walmart) or have them delivered. If only everything on my holiday to-do list could run this smoothly :)
Wednesday, December 8, 2010
Holiday Gift Wrapping Freebies
Are your presents starting to pile up in your designated hiding spots (mine are under the bed) because you haven't had a chance to pick up wrapping paper and/or gift tags? Well fret no more. All you need to whip up these lovelies is a color printer, scissors and tape. I've been collecting so many wonderful freebies via blogland and here are some of my favorites. Time to start wrapping!
Monday, December 6, 2010
Weekend Ramblings

Good Monday morn to ya! How was your weekend? I had one of those partly random kinda weekends where you run into friends you haven't seen in a long time and where you make plans on a whim. All and all a very fun and fly by my seat kinda weekend. And what completed my weekend happened last night, while I was unwinding, I was gleefully enjoying all the handmade holiday decor around my pad.

Noel Frame made this holiday.
I also started this fun crafty project yesterday and am excited to share with you what I made out of these thrifted holiday sweaters. (Hint: I am making three of them that will be displayed on the staircase and it's one of my most favorite parts of Christmas Day. More details to come soon :)
Labels:
Craft Night,
DIY,
friends,
handmade holiday,
weekend roundup
Wednesday, December 1, 2010
Hello December
I've missed you and all things that revolve around you like hot chocolate, ice skating, Christmas tunes, pine trees, walking on freshly fallen snow, skiing, baking, decorating, and most important spending time with family. Yes, I admit! I am a holiday junkie!! Although nowadays I choose to make my gifts instead of buy them. And speaking of gifts, I wanted to share with you a special one that I started putting together this week. Who wouldn't enjoy reliving a moment in time each month for the new year? I bought this DIY mini desk calender kit from the awesome paislee press. For $4.99 you get 12 layered templates (sized 4 x 6 & 5 x 7) one for each month as well as at a glance calender of the entire year . With easy clipping masks, inserting your own photo is a breeze! Plus with convienent photo sizes you can easily print them at home or send the files to the printer of your choice. The hardest part is deciding what photo to use for each month. I can't wait to start printing these babies out on my Epson. But mostly I can't wait to see the look on my family member's faces as they look back on some of our favorite family moments.
Labels:
calender 2011,
December,
DIY,
handmade holiday,
Hello,
paislee press
Tuesday, November 30, 2010
Handmade Holiday
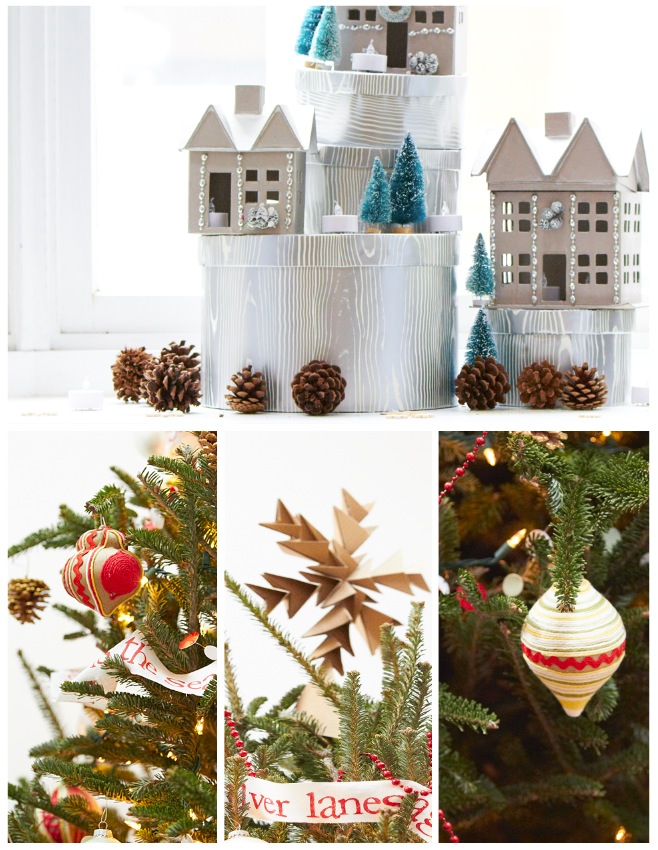
I am so excited to share with you today a few of my DIY tree decorations that I've been working on over my holiday break last week. My intentions for creating my tree decorations was this: Just because I'm on a limited budget doesn't mean that I can't craft up a few things to transform my space into feeling a bit more like Christmas. Not only was I able to use most of my own crafting supplies but I even had enough money to purchase a few boxed ornaments to complement all the DIY goodness! Below is a breakdown of resources and materials used to create the yarn ornaments, dot garland, and Christmas banner.
Materials:
Paper Mache ornaments- 40 cents/each
Red and Green (multi colored) Yarn- $4
Red Rick Rack Ribbon ( in 1/2" and 1" widths)- owned
Elmers craft fabric glue- $3.27 (or any glue that dries clear)
All the materials for these ornaments were purchased at Hobby Lobby.
If you act fast you can even get the paper mache ornaments at 40% off! I stocked up
and purchased 12 to decorate my tree.
Total for 12 ornaments: $12.07
Instructions:
To decorate these I really just let me creativity take over and used the red and green yarn and rick rack sparingly. Just make sure to use a glue that dries clear, so if the yarn doesn't cover it you won't end up with white splotches of dried glue on the paper mache. I kept some of the paper mache exposed to keep with the handmade theme.
Dot Garland
Materials:
Avery round 3/4" and 1" white round labels- $6.50/a pack
Monofilament fishing line (clear)- owned
Painter's Touch spray paint in Apple Red and Herbal Green- owned
I owned most of the supplies for this garland and purchased the labels at Staples.
Total cost: $13 for an endless (almost) amount of playful garland.
Instructions:
Place your labels on a covered surface and spray paint both sizes with spray paint. Make sure to leave some of them unpainted as well. Once they are dry, take two (of the same size) and stick them together in between a strand of clear fishing line. I repeated this mixing the red, green, and white labels leaving a few inches in between each other.

Christmas banner
Materials:
Paper Mache ornaments- 40 cents/each
Red and Green (multi colored) Yarn- $4
Red Rick Rack Ribbon ( in 1/2" and 1" widths)- owned
Elmers craft fabric glue- $3.27 (or any glue that dries clear)
All the materials for these ornaments were purchased at Hobby Lobby.
If you act fast you can even get the paper mache ornaments at 40% off! I stocked up
and purchased 12 to decorate my tree.
Total for 12 ornaments: $12.07
Instructions:
To decorate these I really just let me creativity take over and used the red and green yarn and rick rack sparingly. Just make sure to use a glue that dries clear, so if the yarn doesn't cover it you won't end up with white splotches of dried glue on the paper mache. I kept some of the paper mache exposed to keep with the handmade theme.
-------------------------------------------------------
Dot Garland
Materials:
Avery round 3/4" and 1" white round labels- $6.50/a pack
Monofilament fishing line (clear)- owned
Painter's Touch spray paint in Apple Red and Herbal Green- owned
I owned most of the supplies for this garland and purchased the labels at Staples.
Total cost: $13 for an endless (almost) amount of playful garland.
Instructions:
Place your labels on a covered surface and spray paint both sizes with spray paint. Make sure to leave some of them unpainted as well. Once they are dry, take two (of the same size) and stick them together in between a strand of clear fishing line. I repeated this mixing the red, green, and white labels leaving a few inches in between each other.
-------------------------------------------------------

Christmas banner
Materials:
Cotton cream strip of fabric- owned
Red acrylic paint-owned
Small paint brush-owned
Set of foam alphabet letters- owned
It's always exciting to come up with a project that costs you nothing! I just happened to have a large roll of this cotton fabric (about 4 inched wide) that I found for a dollar at the thrift store last year. The alphabet letter set I purchased at Micheal's. It comes with lower case and upper case letters. I ended up making about 15 feet of this using lines from Christmas songs.
Instructions:
I painted each letter using a small paint brush and red acrylic paint. And because each letter was hand stamped onto the fabric I ended up with some paint splotches around some of the letters, which I think just adds character. Set aside to dry and then hang! To give the banner some extra weight I taped a thin piece of wire on the back to better manipulate it's shape and placement on the tree branches.
Cotton cream strip of fabric- owned
Red acrylic paint-owned
Small paint brush-owned
Set of foam alphabet letters- owned
It's always exciting to come up with a project that costs you nothing! I just happened to have a large roll of this cotton fabric (about 4 inched wide) that I found for a dollar at the thrift store last year. The alphabet letter set I purchased at Micheal's. It comes with lower case and upper case letters. I ended up making about 15 feet of this using lines from Christmas songs.
Instructions:
I painted each letter using a small paint brush and red acrylic paint. And because each letter was hand stamped onto the fabric I ended up with some paint splotches around some of the letters, which I think just adds character. Set aside to dry and then hang! To give the banner some extra weight I taped a thin piece of wire on the back to better manipulate it's shape and placement on the tree branches.
Labels:
christmas tree,
DIY,
DIY yarn ornaments,
garland,
handmade holiday,
November,
ornaments
Subscribe to:
Posts (Atom)