

{1}.Laptop
{2}.Printer
{3}.Avery Labels 25/pk. $23.99
{4}.Shipping Tags
_______________________________________________
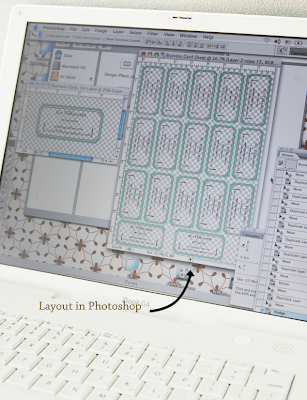
STEP 1: Design & Layout
Using Photoshop or another photo editing program create a new 4 x 6 sized document. I find that designing one label in this smaller document size is easier and allows you to save a smaller file for future revisions. After I'm happy with my design and type placement I create an 8 x 10 document (this is a little smaller than the 8.5 x 11 Avery paper size). Copy & paste your finished label into this new document and arrange your label to desired printable size. (see photo below) For my labels I printed them 3.5 x 1- 3/4 to fit onto my shipping labels. Continue to copy & paste your label until you fill your 8 x 10 document. I was able to fit 17 onto one page. Make sure to leave enough space in between each label to allow for cutting.
{2}.Printer
{3}.Avery Labels 25/pk. $23.99
{4}.Shipping Tags
_______________________________________________
STEP 1: Design & Layout
Using Photoshop or another photo editing program create a new 4 x 6 sized document. I find that designing one label in this smaller document size is easier and allows you to save a smaller file for future revisions. After I'm happy with my design and type placement I create an 8 x 10 document (this is a little smaller than the 8.5 x 11 Avery paper size). Copy & paste your finished label into this new document and arrange your label to desired printable size. (see photo below) For my labels I printed them 3.5 x 1- 3/4 to fit onto my shipping labels. Continue to copy & paste your label until you fill your 8 x 10 document. I was able to fit 17 onto one page. Make sure to leave enough space in between each label to allow for cutting.

_______________________________________________
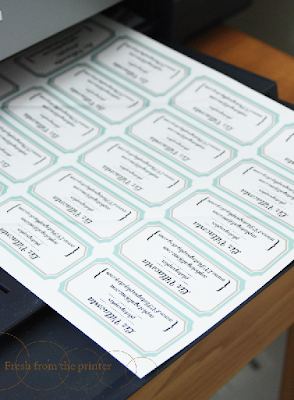
STEP 2: Printing
Adjust your printers settings to match your paper size & paper type. For this printing material I used the paper size 8.5 x 11 and the setting for luster paper.
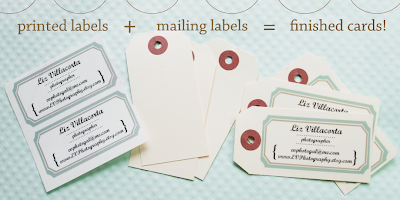
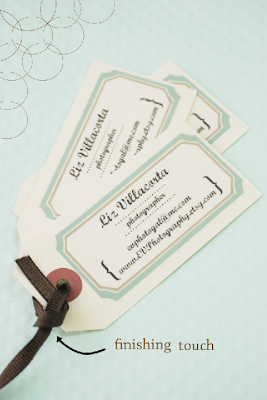
Gather your shipping labels and printed labels. Peel the backing off your printed label (yes, these are like stickers)! Place and secure onto the shipping label.
Add your finishing touch to your personalized cards & start handing them out! Yay.
Adjust your printers settings to match your paper size & paper type. For this printing material I used the paper size 8.5 x 11 and the setting for luster paper.

_______________________________________________
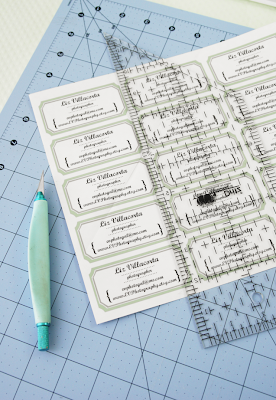
STEP 3: Cut/Peel & Paste
Once printed I recommend using a straight edge and exacto knife to trim away the excess white around your labels.
Once printed I recommend using a straight edge and exacto knife to trim away the excess white around your labels.

Gather your shipping labels and printed labels. Peel the backing off your printed label (yes, these are like stickers)! Place and secure onto the shipping label.

_______________________________________________
STEP 4: Add Personal TouchAdd your finishing touch to your personalized cards & start handing them out! Yay.

4 comments:
Great find on the clear labels. I was wondering what kind of sticker to put on my cello bags. Love the tags!
Your tags look wonderful!!!!! I tried making some with my logo a few months ago, and they didn't look cute like yours!
How great is this! Thanks so much for putting this together and for sharing it.
Thanks gals! It'd love to see what lovely cards you come up with ;)
Post a Comment